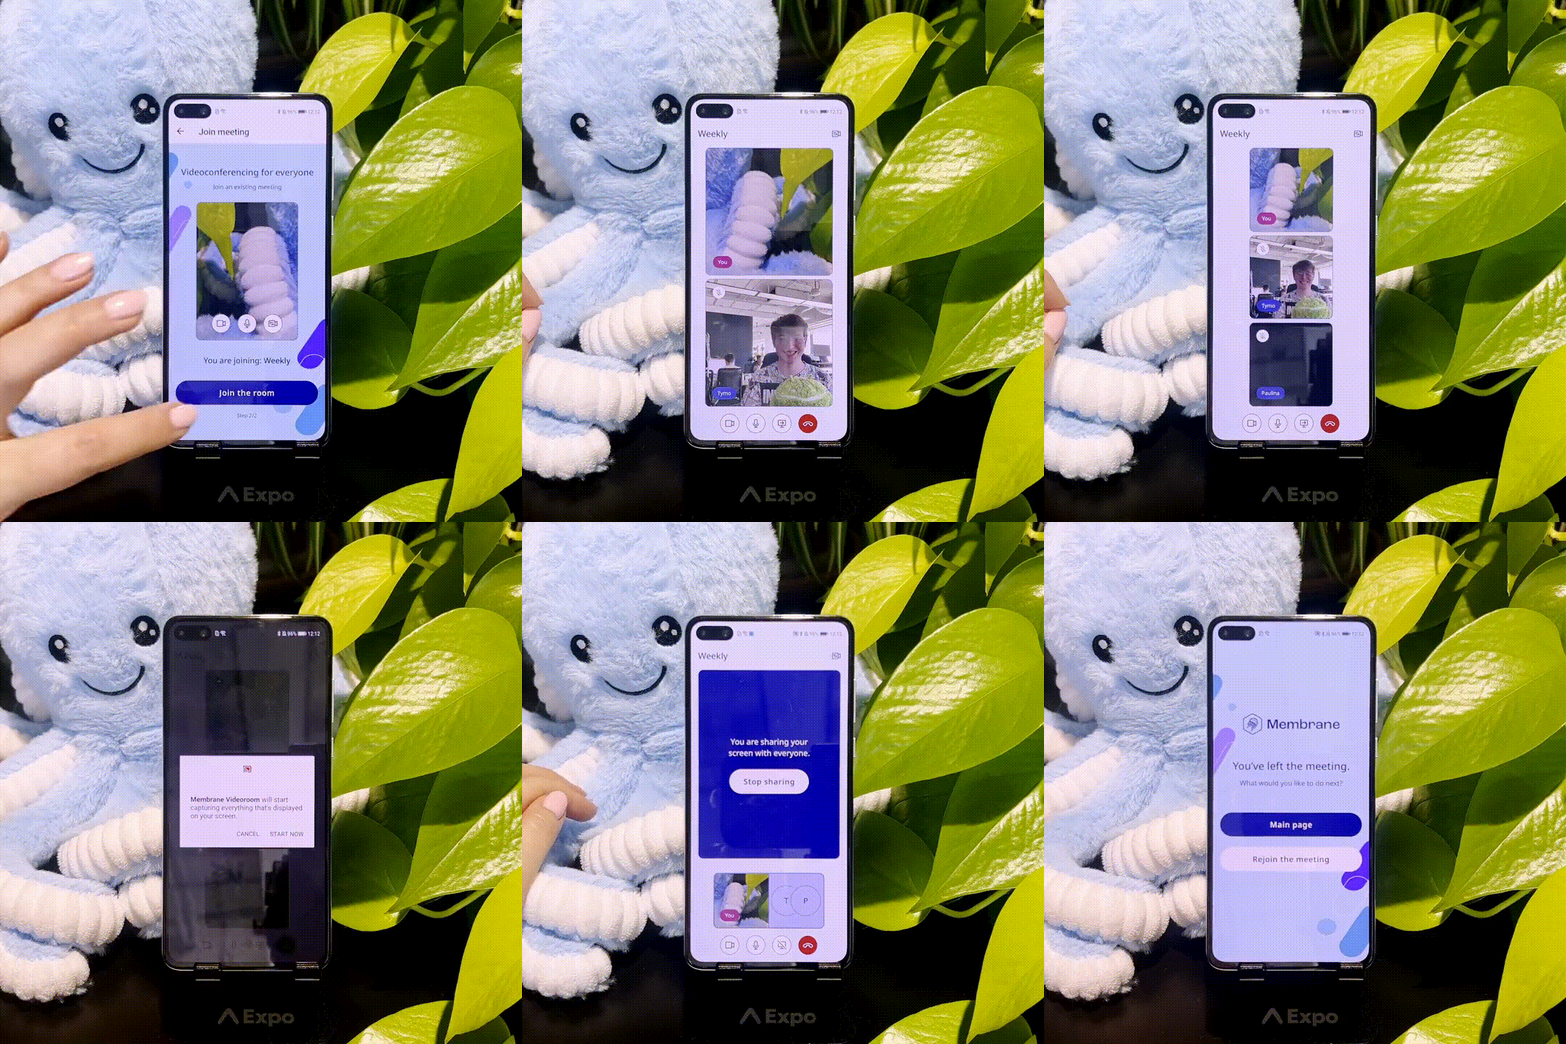
React Native Minimal Working Example
This guide expects that you have read Basic Concepts and Example Scenarios
This tutorial is compatible with react-native-client-sdk version 0.1.6
What you'll learn
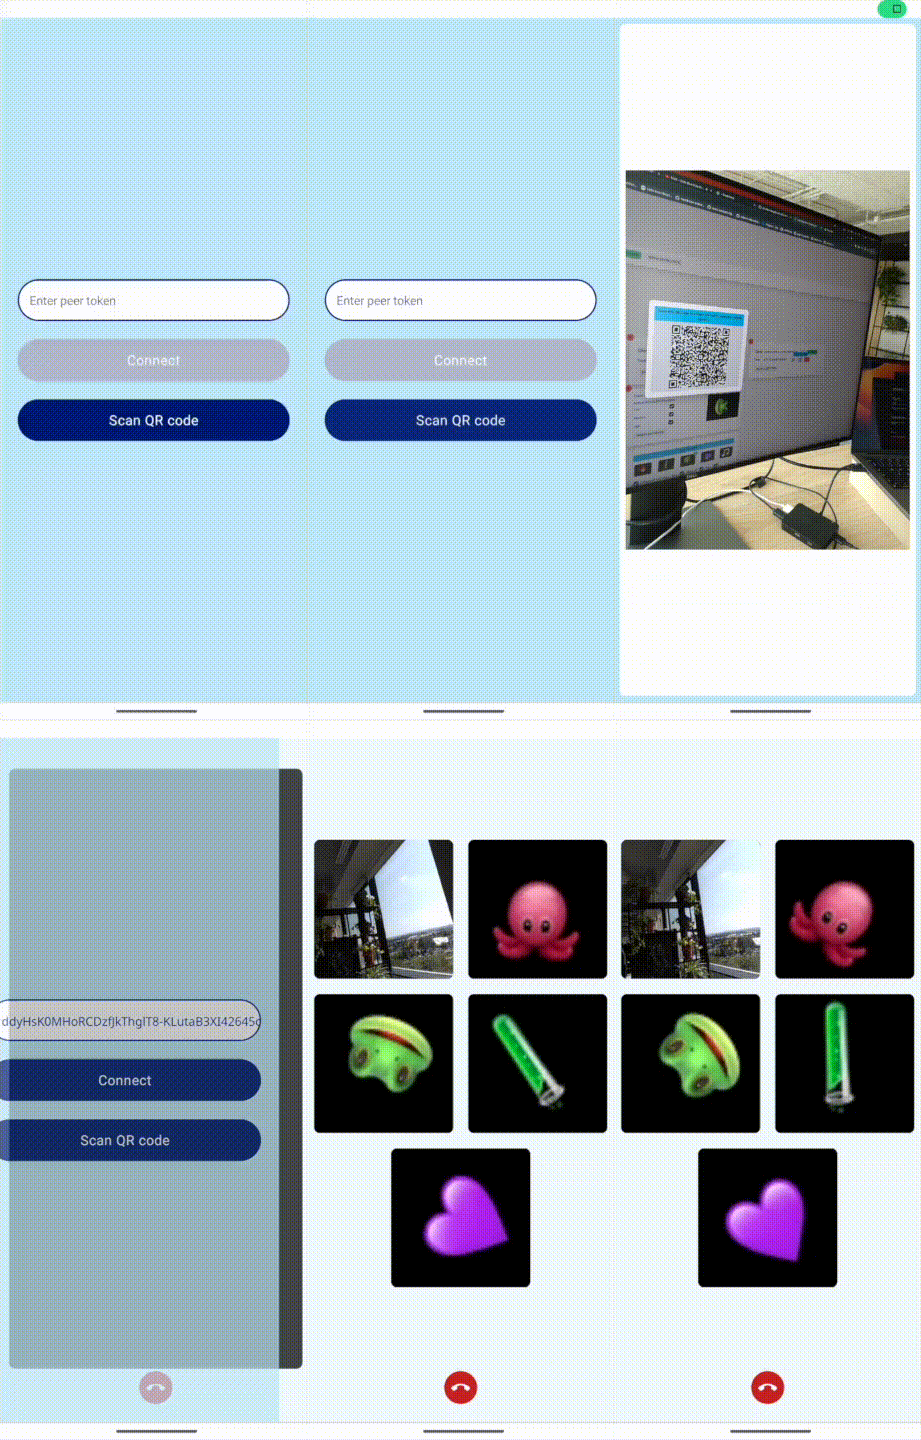
This tutorial will guide you through creating your first React Native / Expo project which uses Jellyfish client. By the end of the tutorial, you'll have a working application that connects to an instance of Jellyfish Server using WebRTC, streaming and receiving multimedia.

What do you need
- a little bit of experience in creating apps with React Native and/or Expo - refer to the React Native Guide or Expo Guide to learn more
Jellyfish architecture
You can learn more about Jellyfish architecture in Jellyfish docs. This section provides a brief description aimed at front-end developers
Let's introduce some concepts first:
- Peer - A peer is a client-side entity that connects to the server to publish, subscribe or publish and subscribe to tracks published by components or other peers. You can think of it as a participant in a room. At the moment, there is only one type of peer - WebRTC.
- Track - An object that represents an audio or video stream. A track can be associated with a local media source, such as a camera or microphone, or a remote media source received from another user. Tracks are used to capture, transmit, and receive audio and video data in WebRTC applications.
- Room - In Jellyfish, a room serves as a holder for peers and components, its function varying based on application. From a front-end perspective, this will be probably one meeting or a broadcast.
For a better understanding of these concepts here is an example of a room that holds a standard WebRTC conference from a perspective of the User:
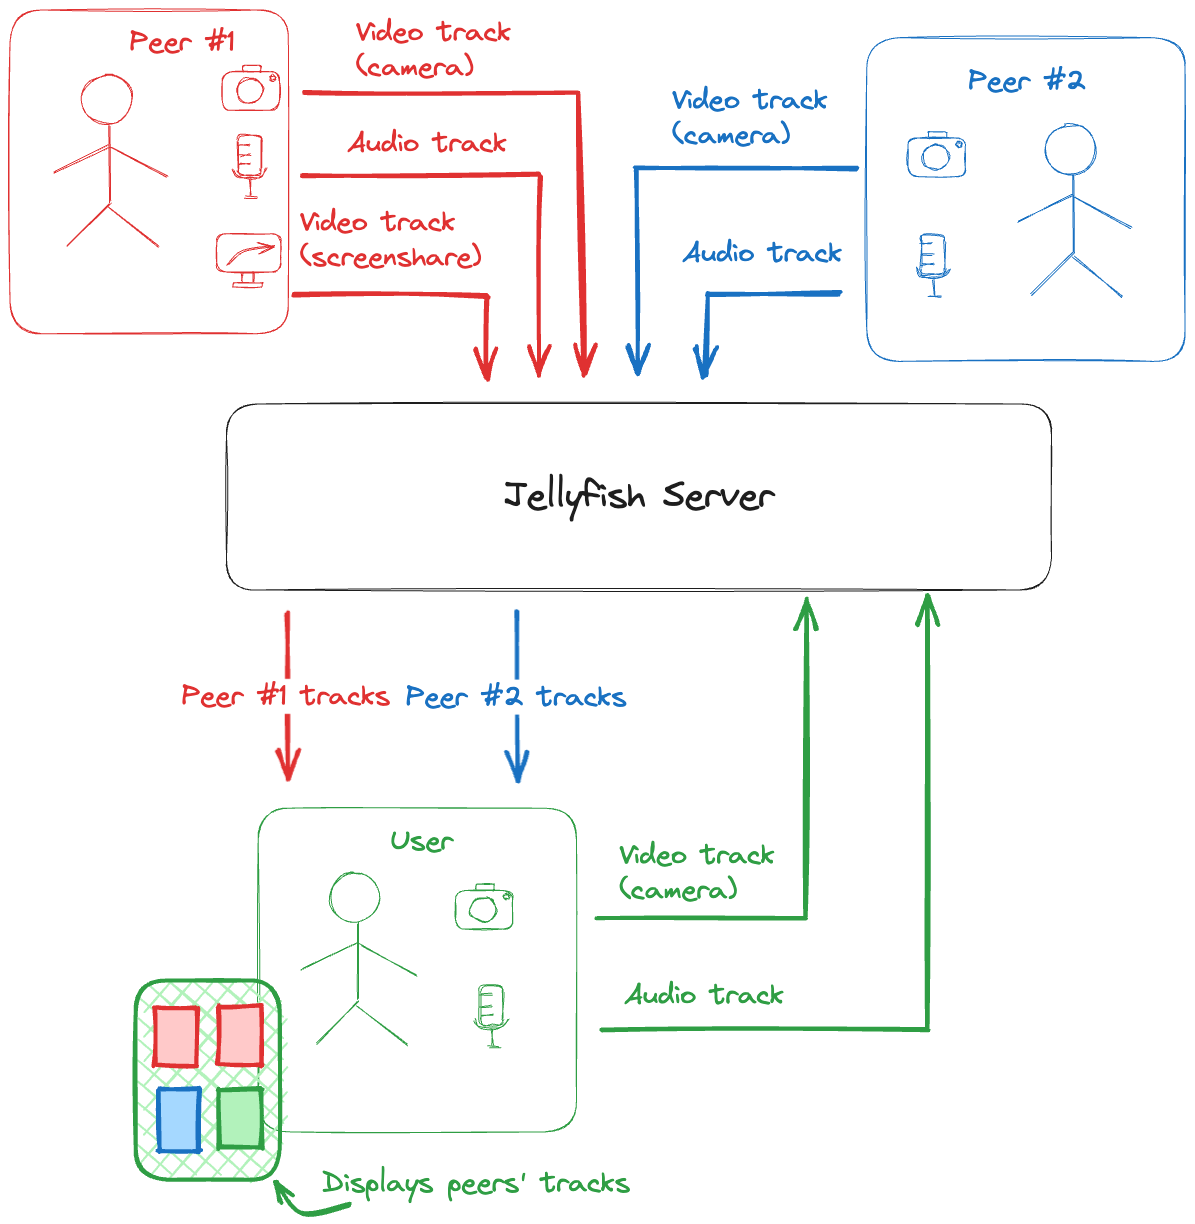
In this example, peers stream multiple video and audio tracks. Peer #1 streams even two video tracks (camera and screencast track). You can differentiate between them by using track metadata. The user gets info about peers and their tracks from the server using Jellyfish Client. The user is also informed in real time about peers joining/leaving and tracks being added/removed.
To keep this tutorial short we'll simplify things a little. Every peer will stream just one video track.
Connecting and joining the room
The general flow of connecting to the server and joining the room in a standard WebRTC conference setup looks like this:
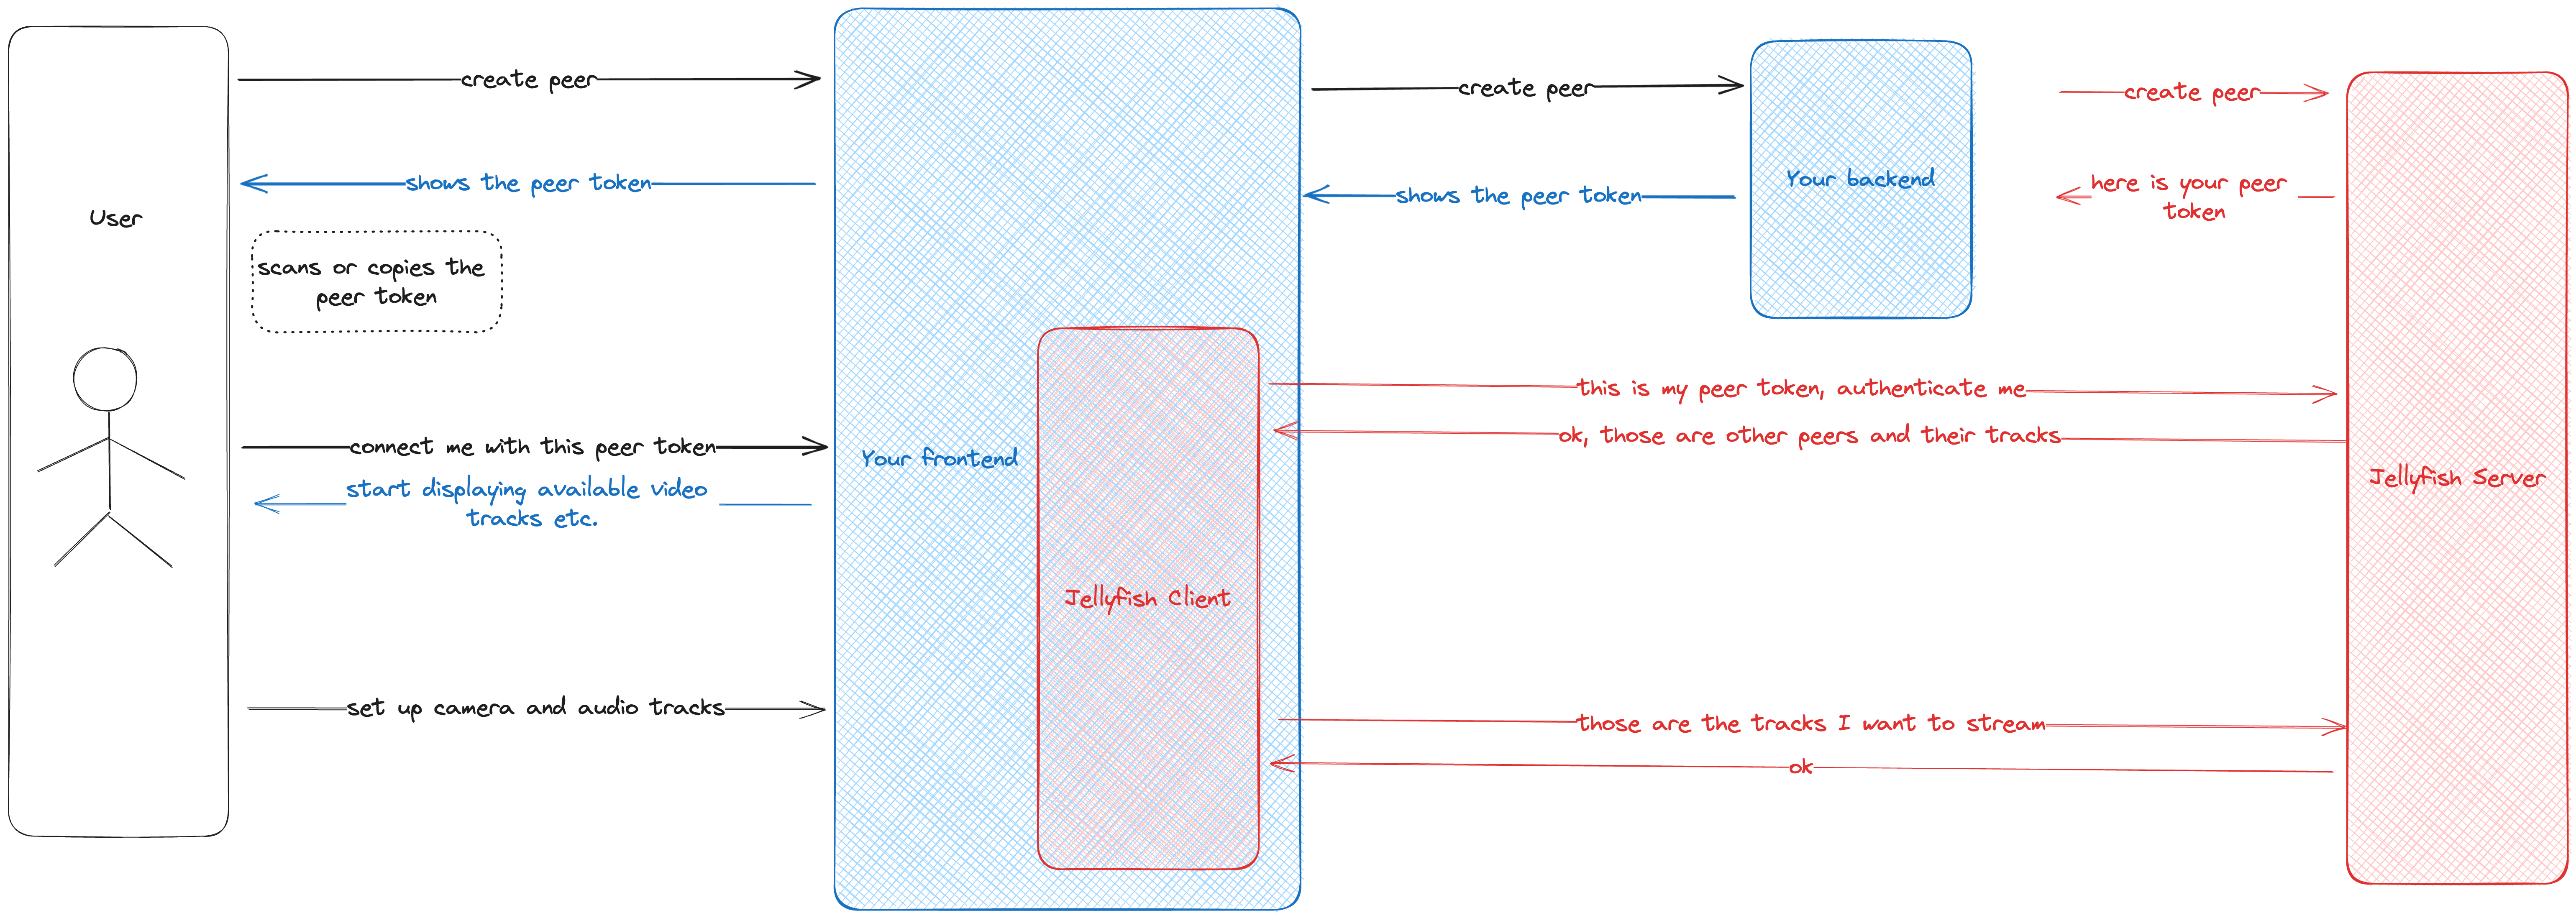
The parts that you need to implement are marked in blue and things handled by Jellyfish are marked in red.
Firstly, the user logs in. Then your backend authenticates the user and obtains a peer token. It allows the user to authenticate and join the room in Jellyfish Server. The backend passes the token to your front-end, and your front-end passes it to Jellyfish Client. The client establishes the connection with Jellyfish Server. Then Jellyfish Client sets up tracks (camera, microphone) to stream and joins the room on Jellyfish Server. Finally, your front-end can display the room for the user.
For this tutorial we simplified this process a bit - you don't have to implement a backend or authentication. Jellyfish Dashboard will do this for you. It's also a nice tool to test and play around with Jellyfish. The flow with Jellyfish Dashboard looks like this:
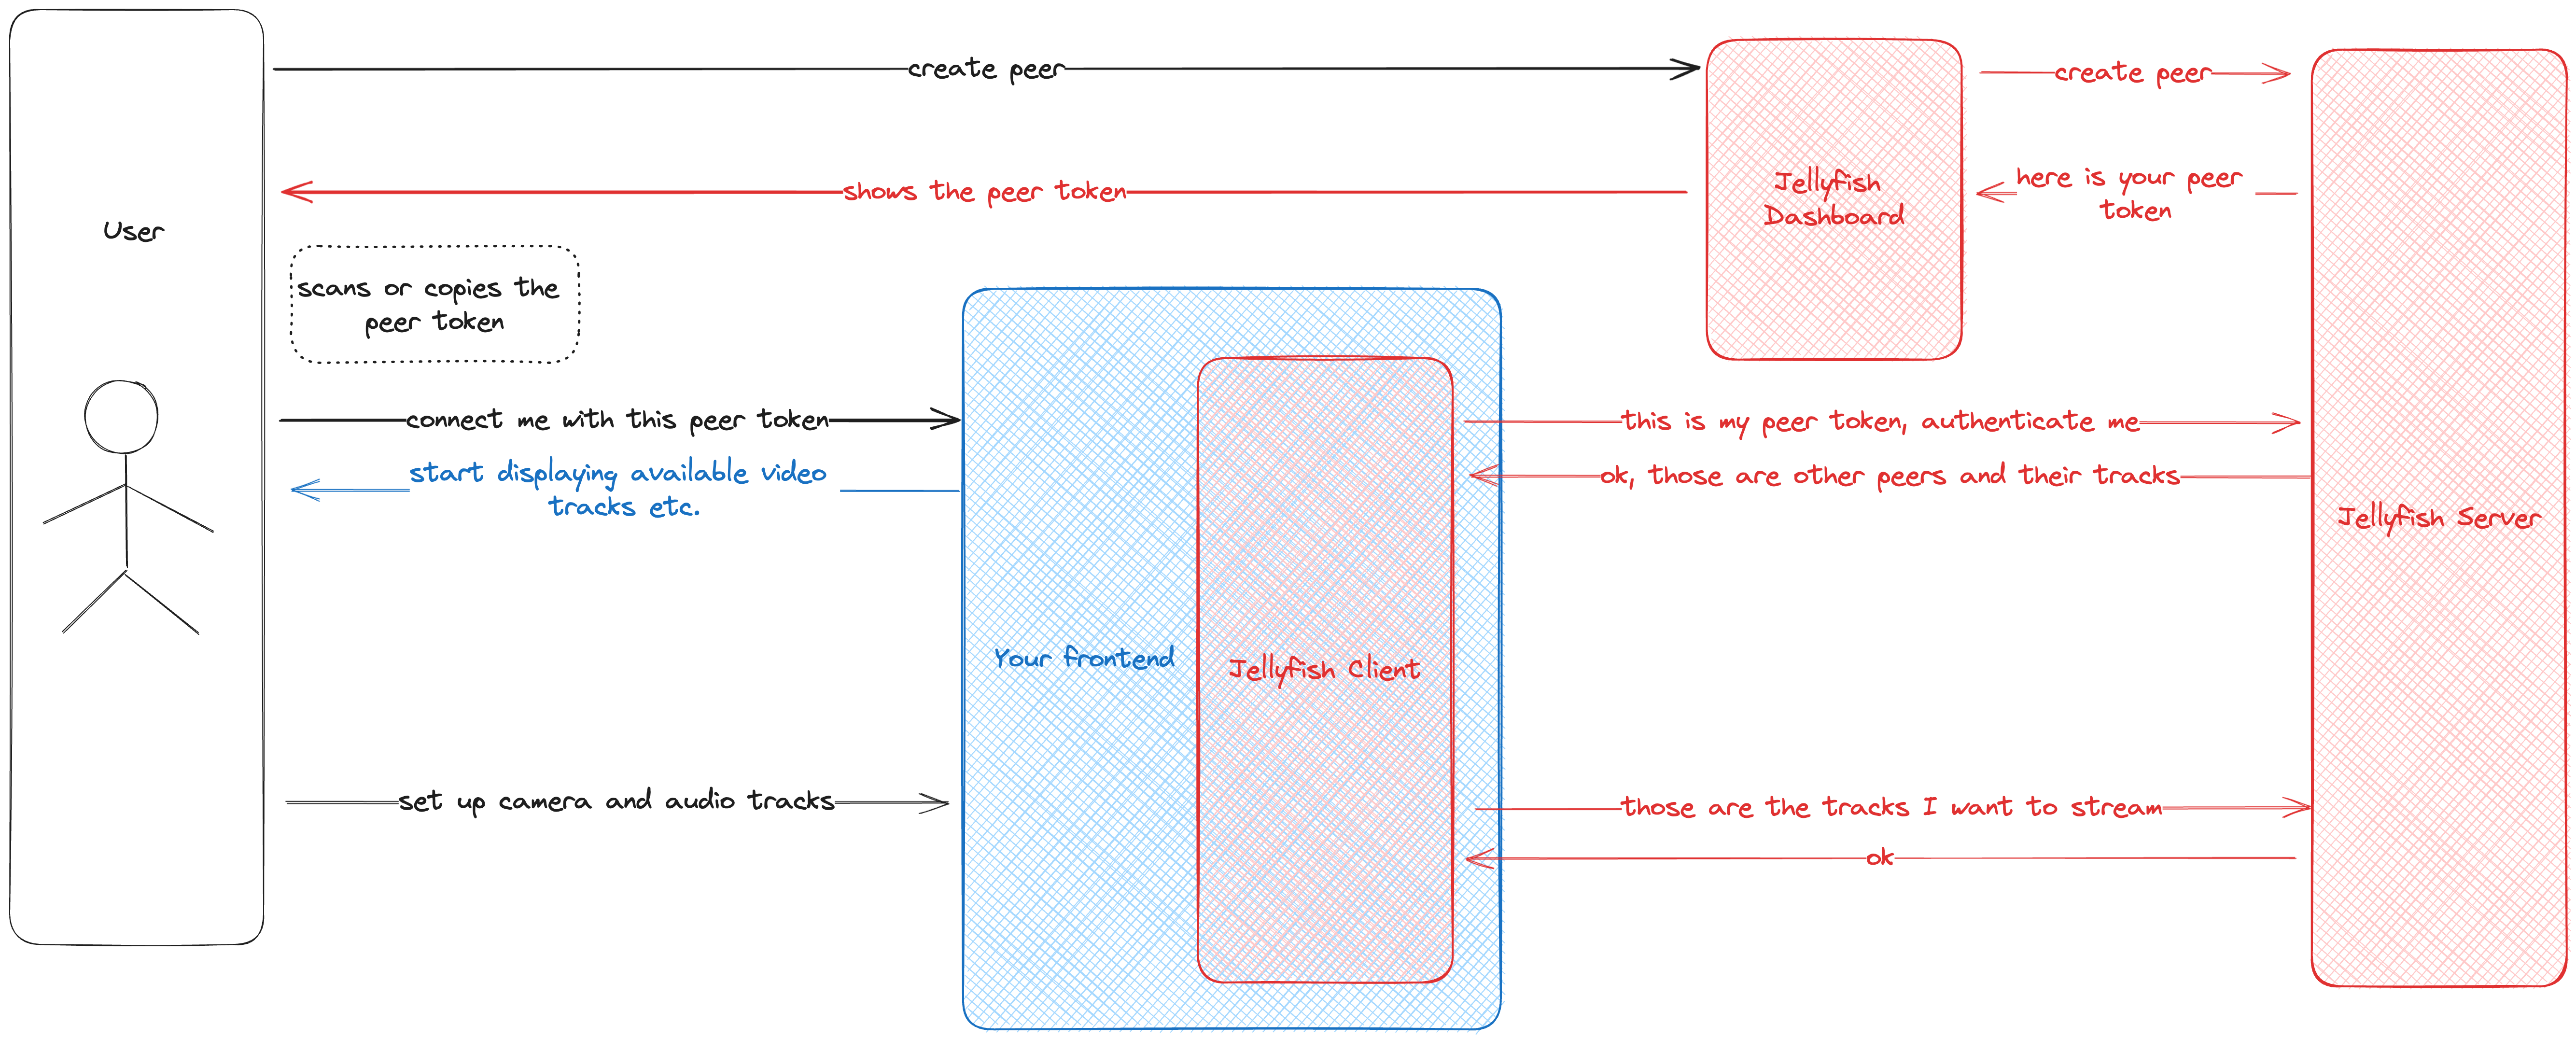
You can see that the only things you need to implement are interactions with the user and Jellyfish Client. This tutorial will show you how to do it.
Setup
Start the Jellyfish Dashboard
For testing, we'll run the Jellyfish Media Server locally using Docker image:
docker run -p 50000-50050:50000-50050/udp \
           -p 5002:5002/tcp \
           -e JF_CHECK_ORIGIN=false \
           -e JF_HOST=<your ip address>:5002 \
           -e JF_PORT="5002" \
           -e JF_WEBRTC_USED=true \
           -e JF_WEBRTC_TURN_PORT_RANGE=50000-50050 \
           -e JF_WEBRTC_TURN_IP=<your ip address> \
           -e JF_WEBRTC_TURN_LISTEN_IP=0.0.0.0 \
           -e JF_SERVER_API_TOKEN=development \
           ghcr.io/jellyfish-dev/jellyfish:0.5.0
Make sure to set JF_WEBRTC_TURN_IP and JF_HOST to your local IP address. Without it, the mobile device won't be able to connect to the Jellyfish.
To check your local IP you can use this handy command (Linux/macOS):
ifconfig | grep "inet " | grep -Fv 127.0.0.1 | awk '{print $2}'
Start the dashboard web front-end
There are a couple of ways to start the dashboard:
- Up-to-date version
- Docker container
- Official repository
The current version of the dashboard is ready to use and available here. Ensure that it is compatible with your Jellyfish server! Please note that this dashboard only supports secure connections (https/wss) or connections to localhost. Any insecure requests (http/ws) will be automatically blocked by the browser.
The dashboard is also published as a docker image, you can pull it using:
docker pull ghcr.io/jellyfish-dev/jellyfish-dashboard:v0.1.2
You can also clone our repo and run dashboard locally
Create React Native / Expo project
If you want to skip creating and setuping app clone this repo. Then continue from this step.
If you want ready to use app just clone and run this repo. Remember to change your server url.
Firstly create a brand new project and change directory.
- React Native
- Expo Bare workflow
npx react-native@latest init ReactNativeJellyfishExample && cd ReactNativeJellyfishExample
npx react-native init ReactNativeJellyfishExample --template react-native-template-typescript && cd ReactNativeJellyfishExample
Add dependencies
Please make sure to install or update expo to version ^50.0.0
You have two options here. You can follow configuration instructions for
React Native (Expo Bare workflow is a React Native project after all) or if
you're using expo prebuild command to set up native code you can add our Expo
plugin.
Just add it to app.json:
{
  "expo": {
    "name": "example",
    //...
    "plugins": ["@jellyfish-dev/react-native-membrane-webrtc"]
  }
}
- React Native
- Expo Bare workflow
In order for this module to work, you'll need to also add expo package. The
package introduces a small footprint, but is necessary as the Jellyfish client
package is built as Expo module.
- npm
- Yarn
npx install-expo-modules@latest
npm install @jellyfish-dev/react-native-client-sdk
npx install-expo-modules@latest
yarn add @jellyfish-dev/react-native-client-sdk
npx install-expo-modules@latest
npx expo install @jellyfish-dev/react-native-client-sdk
Run pod install in the /ios directory to install the new pods
Native permissions configuration
In order to let the application access microphone and camera, you'll need to add some native configuration:
You need to at least set up camera permissions.
On Android add to your AndroidManifest.xml:
<uses-permission android:name="android.permission.CAMERA"/>
For audio you'll need the RECORD_AUDIO permission:
<uses-permission android:name="android.permission.RECORD_AUDIO"/>
On iOS you must set NSCameraUsageDescription in Info.plist file. This value is a description that is shown when iOS asks user
for camera permission.
<key>NSCameraUsageDescription</key>
<string> 🙏 🎥 </string>
Similarly, for audio there is NSMicrophoneUsageDescription.
<key>NSMicrophoneUsageDescription</key>
<string> 🙏 🎤 </string>
We also suggest setting background mode to audio so that the app doesn't
disconnect when it's in the background:
<key>UIBackgroundModes</key>
<array>
  <string>audio</string>
</array>
Screencast requires additional configuration, you can find the details here. To keep this tutorial simple, we will skip this step.
Add source components
For your convenience, we've prepared some files with nice-looking components useful for following this tutorial. Feel free to use standard React Native components or your own components though!
In order to use those files, you need to unzip them and place both folders in your project directory (the one where your package.json is located).
Don't forget to install additional packages which are mandatory to make our components work properly.
npx expo install @expo/vector-icons expo-camera@14.0.x expo-font @expo-google-fonts/noto-sans @react-navigation/native-stack
You'll also need to setup and install Reanimated library (3.3.0), React Navigation (6.1.7) for bare react native project. Also setup Expo Camera (14.0.6).
Run pod install in the /ios directory to install the new pods
Screens
For managing screens we will use React Navigation library, but feel free to pick whatever suits you. Our app will consist of two screens:
ConnectScreenwill allow a user to type in, paste or scan a peer token and connect to the roomRoomScreenwill show room participants with their video tracks
import React from "react";
import { NavigationContainer } from "@react-navigation/native";
import { createNativeStackNavigator } from "@react-navigation/native-stack";
import ConnectScreen from "./screens/Connect";
import RoomScreen from "./screens/Room";

const Stack = createNativeStackNavigator();

function App(): React.JSX.Element {
  return (
    <NavigationContainer>
      <Stack.Navigator>
        <Stack.Screen name="Connect" component={ConnectScreen} />
        <Stack.Screen name="Room" component={RoomScreen} />
      </Stack.Navigator>
    </NavigationContainer>
  );
}

export default App;
ConnectScreen
The UI of the ConnectScreen consists of a simple text input and a few buttons.
The flow for this screen is simple:
the user either copies the peer token from the
dashboard or scans it with a QR code scanner and presses Connect button.
The QR code scanner is provided by our components library and it's completely optional,
just for convenience.
The code for the UI looks like this:
import React, { useState } from "react";
import { View, StyleSheet } from "react-native";
import { NavigationProp } from "@react-navigation/native";
import QRCodeScanner from '../components/QRCodeScanner';
import Button from '../components/Button';
import TextInput from '../components/TextInput';

interface ConnectScreenProps {
  navigation: NavigationProp<any>;
}

function ConnectScreen({ navigation }: ConnectScreenProps): React.JSX.Element {
  const [peerToken, setPeerToken] = useState<string>("");

  return (
    <View style={styles.container}>
      <TextInput
        placeholder="Enter peer token"
        value={peerToken}
        onChangeText={setPeerToken}
      />
      <Button
        onPress={() => {
          /* to be filled */
        }}
        title="Connect"
        disabled={!peerToken}
      />
      <QRCodeScanner onCodeScanned={setPeerToken} />
    </View>
  );
}

const styles = StyleSheet.create({
  container: {
    flex: 1,
    justifyContent: "center",
    backgroundColor: "#BFE7F8",
    padding: 24,
    rowGap: 24,
  },
});

export default ConnectScreen;
Connecting to the server
Once the UI is ready, let's implement the logic responsible for connecting to the server.
Firstly wrap your app with JelyfishContextProvider:
import React from "react";
import { JellyfishContextProvider } from "@jellyfish-dev/react-native-client-sdk";
import { NavigationContainer } from "@react-navigation/native";
import { createNativeStackNavigator } from "@react-navigation/native-stack";
import ConnectScreen from "./screens/Connect";
import RoomScreen from "./screens/Room";

const Stack = createNativeStackNavigator();

function App(): React.JSX.Element {
  return (
    <JellyfishContextProvider>
      <NavigationContainer>
        <Stack.Navigator>
          <Stack.Screen name="Connect" component={ConnectScreen} />
          <Stack.Screen name="Room" component={RoomScreen} />
        </Stack.Navigator>
      </NavigationContainer>
    </JellyfishContextProvider>
  );
}

export default App;
Then in the ConnectScreen use the useJellyfishClient hook to connect to the
server. Simply call the connect method with your Jellyfish server URL and the
peer token. The connect function establishes a connection with the Jellyfish server
via web socket and authenticates the peer.
import { useJellyfishClient } from "@jellyfish-dev/react-native-client-sdk";
import { NavigationProp } from "@react-navigation/native";

interface ConnectScreenProps {
  navigation: NavigationProp<any>;
}

// This is the address of the Jellyfish backend. Change the local IP to yours. We
// strongly recommend setting this as an environment variable, we hardcoded it here
// for simplicity.
// If you use secure connection with your Jellyfish Media Server change ws to wss in this variable.
const JELLYFISH_URL = "ws://X.X.X.X:5002/socket/peer/websocket";

function ConnectScreen({ navigation }: ConnectScreenProps): React.JSX.Element {
  const [peerToken, setPeerToken] = useState<string>("");

  const { connect } = useJellyfishClient();

  const connectToRoom = async () => {
    try {
      await connect(JELLYFISH_URL, peerToken.trim());
    } catch (e) {
      console.log("Error while connecting", e);
    }
  };
  return (
    <View style={styles.container}>
      <TextInput
        placeholder="Enter peer token"
        value={peerToken}
        onChangeText={setPeerToken}
      />
      <Button onPress={connectToRoom} title="Connect" disabled={!peerToken} />
      <QRCodeScanner onCodeScanned={setPeerToken} />
    </View>
  );
}

// ...
Camera permissions (Android only)
To start the camera we need to ask the user for permission first. We'll use a standard React Native module for this:
import {
  View,
  StyleSheet,
  type Permission,
  PermissionsAndroid,
  Platform,
} from "react-native";


// ...

function ConnectScreen({ navigation }: ConnectScreenProps): React.JSX.Element {
  // ...

  const grantedCameraPermissions = async () => {
    if (Platform.OS === "ios") return true;
    const granted = await PermissionsAndroid.request(
      PermissionsAndroid.PERMISSIONS.CAMERA as Permission
    );
    if (granted !== PermissionsAndroid.RESULTS.GRANTED) {
      console.error("Camera permission denied");
      return false;
    }
    return true;
  };

  const connectToRoom = async () => {
    try {
      await connect(JELLYFISH_URL, peerToken.trim());

      if (!(await grantedCameraPermissions())) {
        return;
      }
    } catch (e) {
      console.log("Error while connecting", e);
    }
  };

  // ...
}

// ...
Starting the camera
Jellyfish Client provides a handy hook for managing the camera: useCamera.
Not only it can start a camera but also toggle it, manage its state, simulcast and bandwidth settings, and switch between multiple sources.
Also when starting the camera you can provide multiple different settings such as
resolution, quality, and metadata.
In this example though we'll simply turn it
on to stream the camera to the dashboard with default settings
import {
  useJellyfishClient,
  useCamera,
} from "@jellyfish-dev/react-native-client-sdk";

// ...

function ConnectScreen({ navigation }: ConnectScreenProps): React.JSX.Element {
  // ...

  const { startCamera } = useCamera();

  const connectToRoom = async () => {
    try {
      await connect(JELLYFISH_URL, peerToken.trim());

      if (!(await grantedCameraPermissions())) {
        return;
      }

      await startCamera();
    } catch (e) {
      console.log("Error while connecting", e);
    }
  };

  // ...
}

// ...
Joining the room
The last step of connecting to the room would be actually joining it so
that your camera track is visible to the other users.
To do this simply use the join function
from the useJellyfishClient hook.
You can also provide some user metadata when joining. Metadata can be anything and is forwarded to the other participants as is. In our case, we pass a username.
After joining the room we navigate to the next screen: Room screen.
// ...

function ConnectScreen({ navigation }: ConnectScreenProps): React.JSX.Element {
  const { connect, join } = useJellyfishClient();

  const connectToRoom = async () => {
    try {
      await connect(JELLYFISH_URL, peerToken.trim());

      if (!(await grantedCameraPermissions())) {
        return;
      }

      await startCamera();

      await join({ name: "Mobile RN Client" });
      navigation.navigate("Room");
    } catch (e) {
      console.log("Error while connecting", e);
    }
  };

  // ...
}

// ...
RoomScreen
Displaying video tracks
The Room screen has a couple of responsibilities:
- it displays your own video. Note that it's taken directly from your camera i.e. we don't send it to the JF and get it back so other participants might see you a little bit differently
- it presents current room state so participants list, their video tiles, etc.
- it allows you to leave a meeting
To get information about all participants (also the local one) in the room use
usePeers() hook from Jellyfish Client. The hook returns all the participants
with their ids, tracks and metadata. When a new participant joins or any
participant leaves or anything else changes, the hook updates with the new
information.
To display video tracks Jellyfish Client comes with a dedicated component for
displaying a video track: <VideoRenderer>. It takes a track id as a prop (it
may be a local or remote track) and, as any other <View> in react, a style.
style property gives a lot of possibilities. You can even animate your track!
So, let's display all the participants in the simplest way possible:
import React from "react";
import { View, StyleSheet } from "react-native";
import { NavigationProp } from "@react-navigation/native";
import {
  usePeers,
  VideoRendererView,
} from "@jellyfish-dev/react-native-client-sdk";

interface RoomScreenProps {
  navigation: NavigationProp<any>;
}

function RoomScreen({ navigation }: RoomScreenProps): React.JSX.Element {
  const peers = usePeers();

  return (
    <View style={styles.container}>
      <View style={styles.videoContainer}>
        {peers.map((peer) =>
          peer.tracks[0] ? (
            <VideoRendererView
              trackId={peer.tracks[0].id}
              style={styles.video}
            />
          ) : null
        )}
      </View>
    </View>
  );
}

const styles = StyleSheet.create({
  container: {
    flex: 1,
    alignItems: "center",
    justifyContent: "space-between",
    backgroundColor: "#F1FAFE",
    padding: 24,
  },
  videoContainer: {
    flexDirection: "row",
    gap: 8,
    flexWrap: "wrap",
  },
  video: { width: 200, height: 200 },
});

export default RoomScreen;
First test
Now the app is ready for the first test.
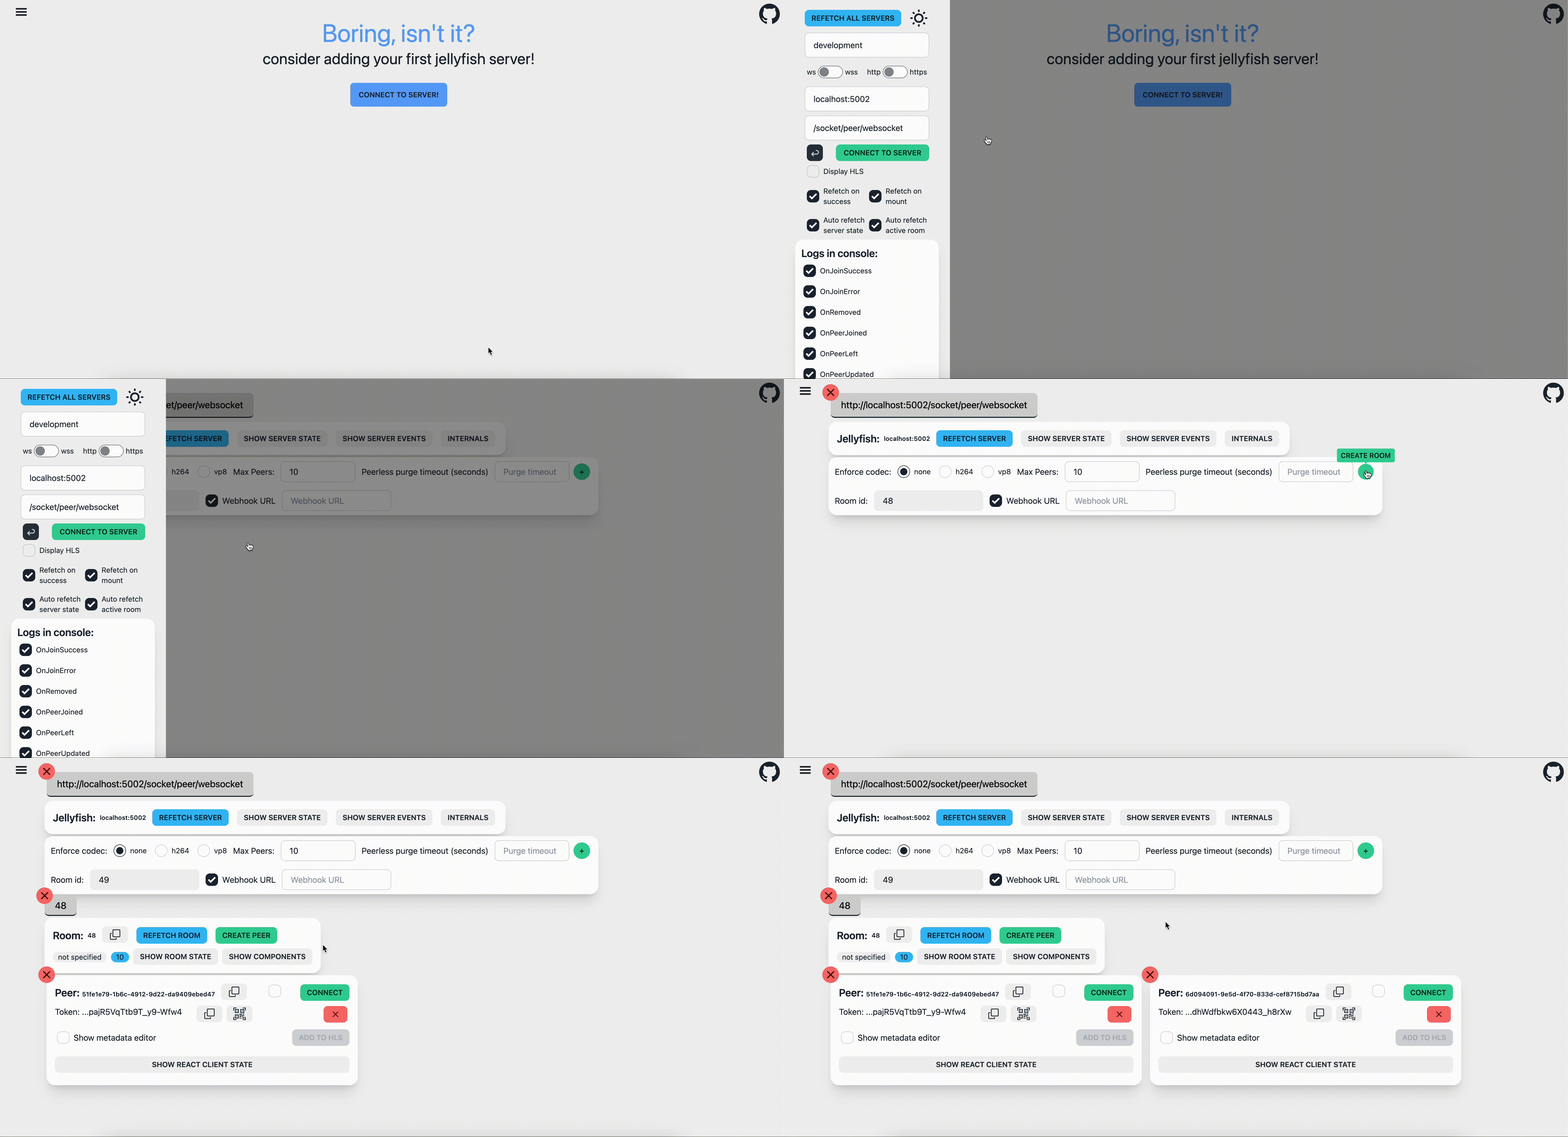
This video shows how to connect to Jellyfish dashboard, create room and peers.

This image shows how you can obtain peer token.
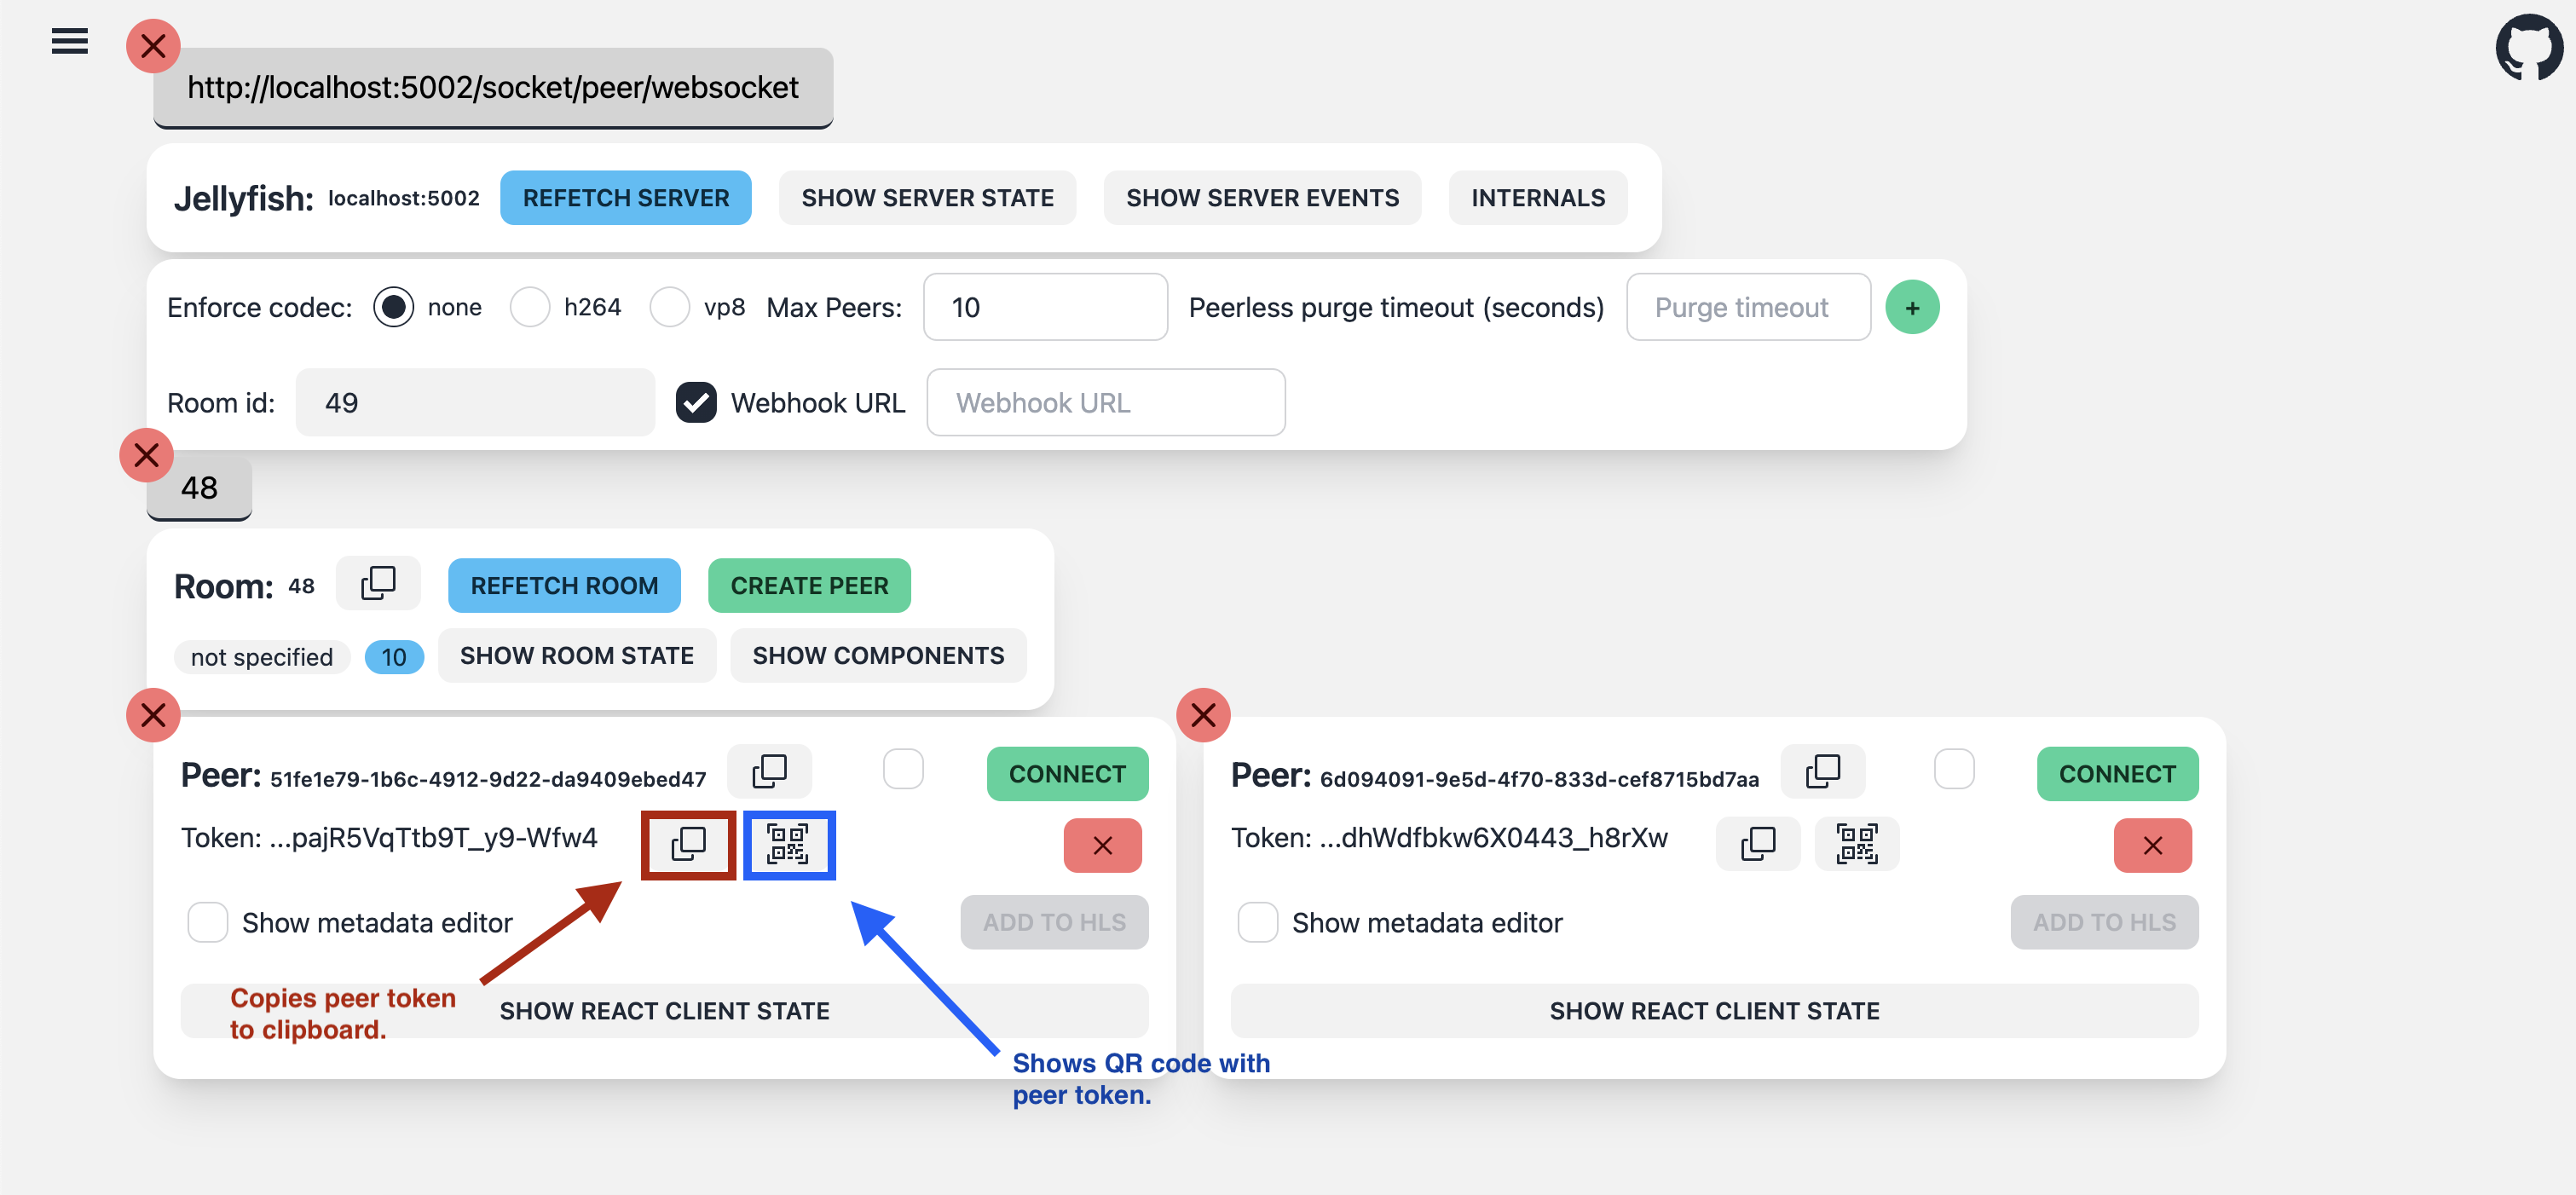

For physical devices, it would be easier to scan a QR code to input the peer token into the app. For virtual devices, it is more convenient to copy the token to the clipboard and then paste it.
Don't connect with the same peer simultaneously from dashboard and mobile app.
Ios simulator does not support camera, but it will display remote tracks. It is strongly recommended to use physical device or android emulator where you can see your camera preview.
Due to react-native hot-reload feature sometimes following error may occur in console logs:
Error while connecting [Error: WebSocket was closed: 1000 peer already connected].
To fix it just kill your app and run it again. Later we will add disconnect button and it will solve this issue.
Before launching your app, start Metro:
- npm
- Yarn
npm start
yarn start
To launch your app, you can use the following command:
- npm
- Yarn
- ios
- android
cd ios && pod install && cd .. && npm run ios
npm run android
- ios
- android
cd ios && pod install && cd .. && yarn ios
yarn android
If everything went well you should see a preview from your camera in app.
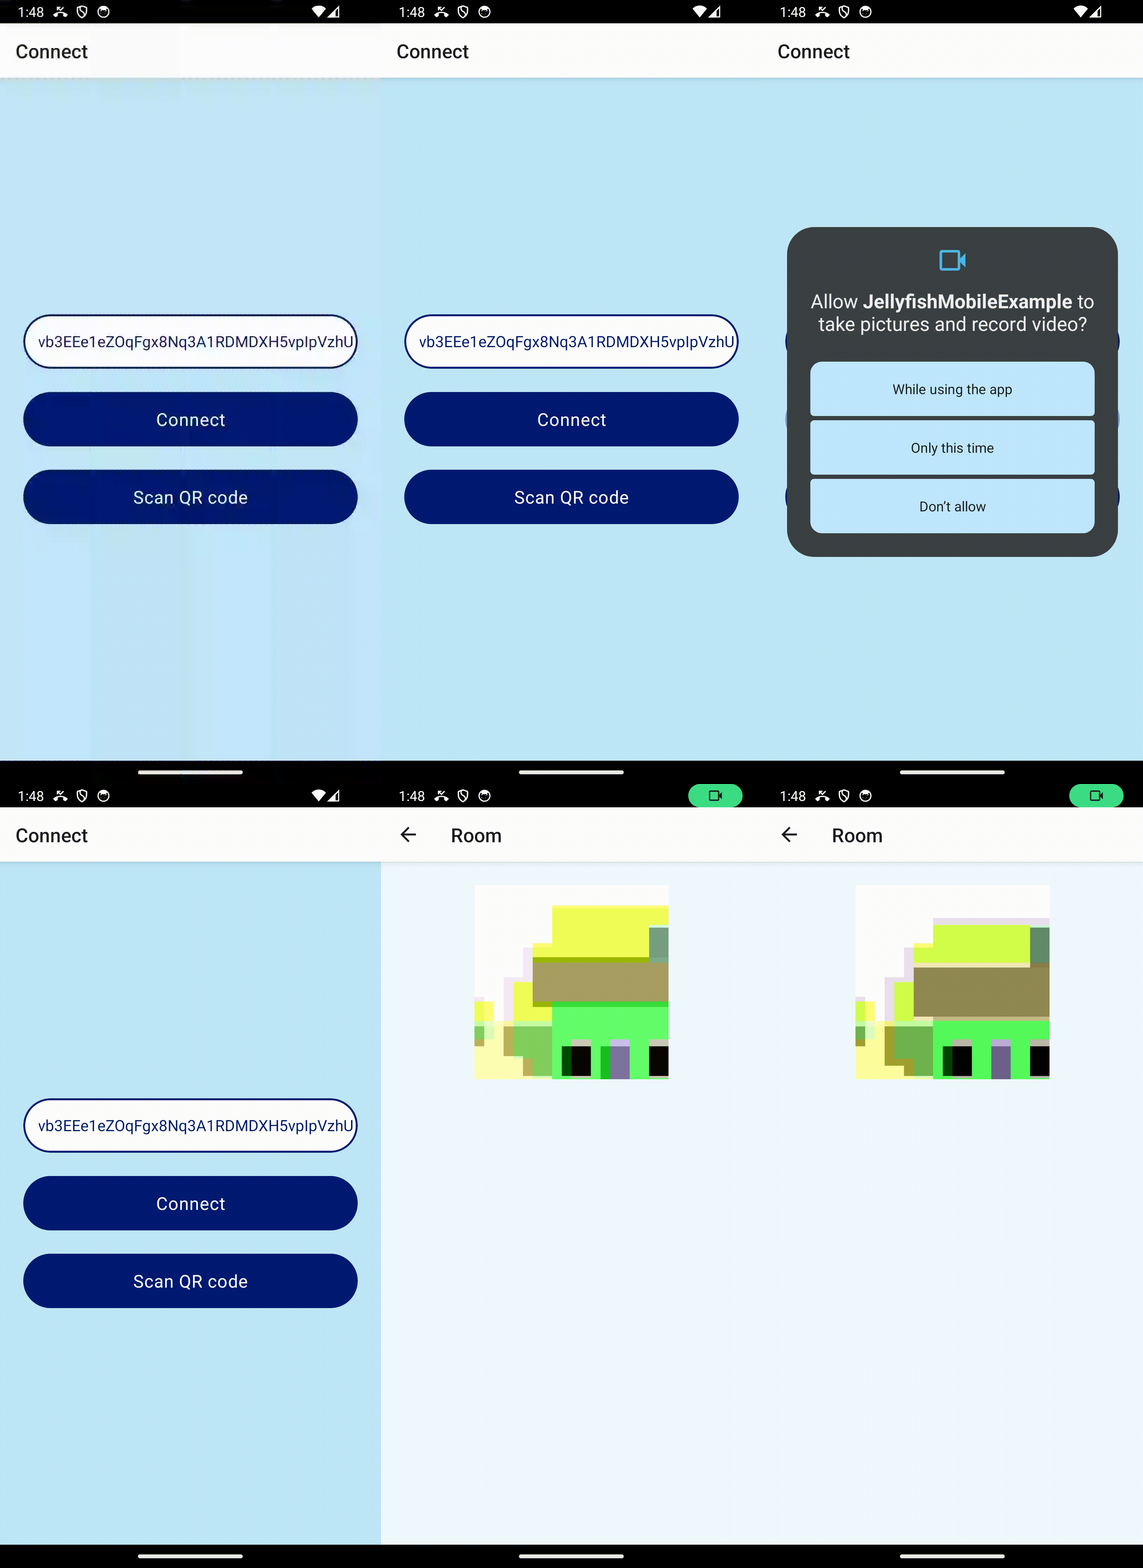

Now onto the second part: displaying the streams from other participants.
This gif shows how to add a fake peer that shares a video track in the dashboard (remember to check the Attach metadata checkbox):


It should show up in the Room screen automatically:
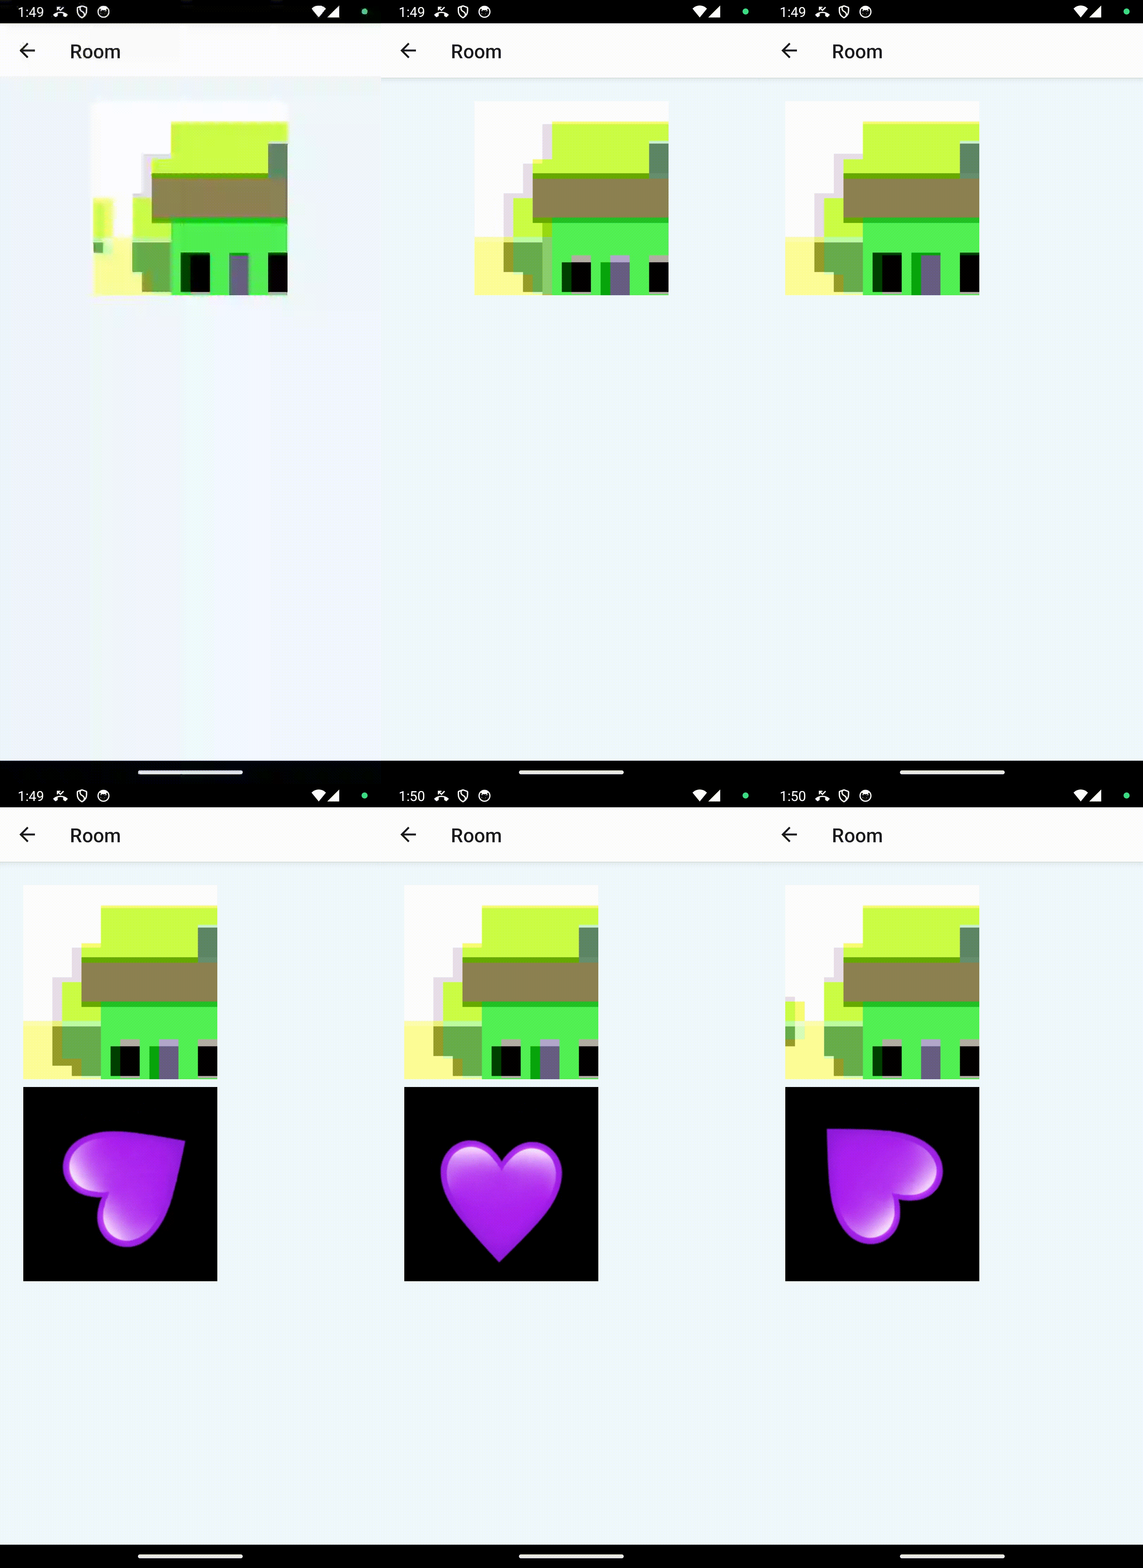

Let's utilize the provided components to implement basic styling and layout for organizing video tracks in a visually appealing grid.
import React, {useMemo} from 'react';
import VideosGrid from '../components/VideosGrid.tsx';

// ...

function RoomScreen({ navigation }: RoomScreenProps): React.JSX.Element {
  const peers = usePeers();
  const tracks = useMemo(() =>
    peers.flatMap(peer =>
      peer.tracks.filter(
        t => t.metadata.type !== 'audio' && (t.metadata.active ?? true),
      ),
  ), [peers]);

  return (
    <View style={styles.container}>
      <VideosGrid
        tracks={tracks}
      />
    </View>
  );
}
Gracefully leaving the room
To leave a room we'll add a button for the user. When the user clicks it, we
gracefully leave the room, close the server connection and go back to the
Connectscreen.
For leaving the room and closing the server connection you can use the cleanUp method from the useJellyfishClient() hook.
// ...

import {
  usePeers,
  VideoRendererView,
  useJellyfishClient,
} from "@jellyfish-dev/react-native-client-sdk";
import InCallButton from '../components/InCallButton.tsx';

// ...

function RoomScreen({ navigation }: RoomScreenProps): React.JSX.Element {
  const peers = usePeers();
  const { cleanUp } = useJellyfishClient();

  const onDisconnectPress = () => {
    cleanUp();
    navigation.goBack();
  };

  return (
    <View style={styles.container}>
      <VideosGrid
        tracks={tracks}
      />
      <InCallButton
        type="disconnect"
        iconName="phone-hangup"
        onPress={onDisconnectPress}
      />
    </View>
  );
}

// ...
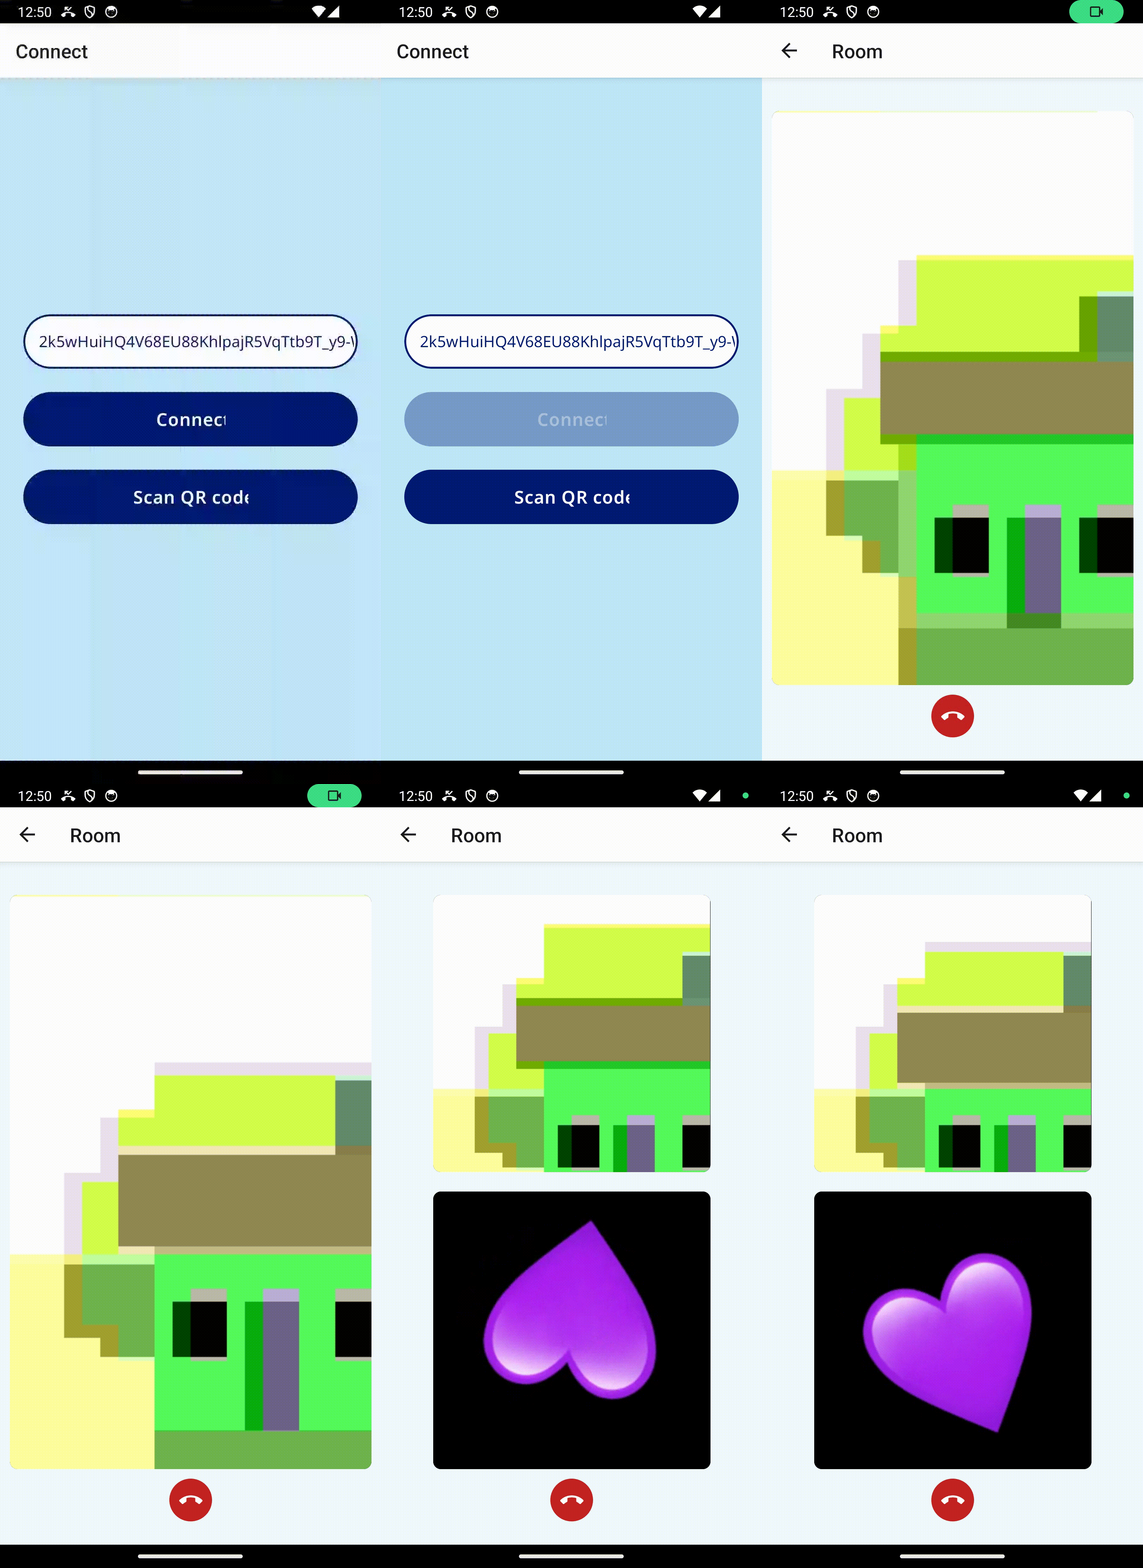
Now your app should look like this:

Summary
Congrats on finishing your first Jellyfish mobile application! In this tutorial, you've learned how to make a basic Jellyfish client application that streams and receives video tracks with WebRTC technology.
But this was just the beginning. Jellyfish Client supports much more than just streaming camera: it can also stream audio, screencast your device's screen, configure your camera and audio devices, detect voice activity, control simulcast, bandwidth and encoding settings, show camera preview, display WebRTC stats and more to come. Check out our other tutorials to learn about those features.
You can also take a look at our fully featured Videoroom Demo example:
